![]() Accounts Payable Invoice Voiding
Accounts Payable Invoice Voiding
The Automatic A/P Invoice Voiding option allows the user to select invoices to be voided. This option will automatically create a reverse entry for the Invoice and marking both the original and reversal Invoice as paid. When the user selects Void Invoices from the Accounts Payable menu, the following screen will come into view.

The list box will show all posted AP Invoices that are eligible for automatic voiding. If an invoice is not showing up in the list box, that is because it is not eligible for automatic voiding.
Show All Open Invoices (check box)
The list box can display ALL posted AP Invoices if the "Show All Open Invoices" check box is ticked. All invoices will be displayed, but if the user attempts to tag an invoice that is not eligible for automatic voiding, the system will display a message explaining why it cannot be automatically voided.
Vendor ID / Name
This field displays the Vendor and Vendor number for all available Accounts Payable Invoices.
Invoice #
This field displays the Invoice number assigned for each of the listed Vendors.
Invoice Date
This field displays the date the Invoice was created.
Amount
This field displays the amount due on each Invoice.
Tag/Untag (button)
Press this button to select or deselect the highlighted invoice(s).
Untag All (button)
Press this button to deselect all invoices for voiding.
Search For... (drop-down list box)
Use this utility to have the system search for a specific invoice to void. The choices for invoice search include Invoice Number, Invoice Date, and Invoice Amount. Select the type of search to be conducted, then indicate the desired Number, Date or Amount in the entry field. Click the "Find Next" button and the program will jump to the next listed invoice that matches the search criteria.
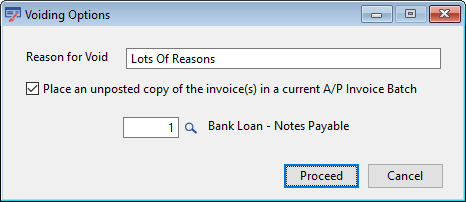
Press this button to complete the Invoice Voiding. The following screen will come into view.

Reason for Void
Optionally supply a reason for the invoice void.
Place an unposted copy... (check box)
Once the invoice is voided, the system can create a new, unposted version of the invoice in the selected batch.

Invoices will be posted to the chosen fiscal period. The fiscal period is listed after the lookup button. The Default fiscal period will be the last period used by the posting program. To change the Fiscal Period, enter the correct fiscal period or press the lookup button and the Fiscal Period Maintenance screen comes into view. Highlight the desired fiscal period and press the Select button. When the displayed fiscal period is correct, press the Post button.
Post voids to original fiscal period and date (check box)
If this box is checked, the transactions generated during this invoice voiding process will be charged to the same fiscal period as the original posting. This option will NOT be available if the original fiscal period has subsequently been Closed.
Press the Preview button to view a preview of the posting. This button will be disabled if the system is set to preview posting reports in General Ledger Setup.
The system will then post the voiding transactions for the tagged invoices. Two Reports will print:
1. The Payables Posted Invoice Journal
2. The General Ledger Summaries of Payable Posting Report.
After the posting process is finished and all reports have been printed, the following screen will come into view.

Finish (button)
Press the Finish button to make the posting permanent.
Undo (button)
Press the Undo button to return all accounting data to the conditions prior to posting.