![]() Accounts Payable: Print Checks / Post Hand Payments
Accounts Payable: Print Checks / Post Hand Payments
The Print Checks / Post Hand Payments program prints checks for all invoices and subcontractor vouchers that have been selected for payment and posts handchecks that have been selected for payment. Pertinent information is printed on the check stubs. For example: Invoice date, Amount of invoice, Discounts taken, Amount not approved for payment and Amount to be paid.
Depending on the check format, up to 14 invoices may be paid by a single check. If there are more invoices selected for payment per vendor than will fit on one check stub, the system will print multiple check stubs and one check. Checks that were used to print information only on the stub will be marked void by the system.
Included on the subcontractor payment check stubs are: The contract amount, Total payment to-date on that contract including the amount being paid by this check, Total backcharges to-date, Total retainage to-date and the retainage paid on this check.
After the Checks have been printed, Lien Wavers may be printed.
Checks may be paid and/or Hand Payments posted by selecting Print Checks / Post Hand Payments under Payments on the Accounts Payable Menu. The following screen will come into view.

Post Checks to the following Fiscal Period
Select the fiscal period to which accounting transactions made by the check run will be assigned. The default fiscal period will be the current fiscal period.
Print Separate Checks by Job (check box)
If checks for different jobs to the same vendor should be printed separately, check this box. Leaving the box unchecked will print all invoices for the same vendor on the same check.
Print Subcontract Summaries (check box)
If Subcontract Summaries for each vendor should be printed, check this box
The default payables checking account specified in the Payables Tab of Setup Accounting Options will be automatically entered. Enter an alternate checking account number or press the lookup button and the General Ledger Accounts screen will come into view. Highlight the desired account number and press the Select button.
Current Balance
This field displays the Current Checking Account Balance. This field is only visible if the current user has permission. See Setup: Menu Access Levels.
The system date will automatically be entered as the date of all checks printed in this run. Otherwise, enter an alternate check date or press the lookup button and a Calendar will come into view. Choose the correct date and press the OK button.
Enter the number of the first vendor check in the printer.
This option will only be available if in the Payable Tab of Setup Accounting Options a laser check format was selected. The laser check formats are 9039, 9085, 9099. For more information, see Check formats.
There are three print heights:
1. Highest -prints the check two lines higher than the normal format.
2. Higher -prints the check one line higher than the normal format.
3. Normal - this is the standard check format.
4. Lower - prints the check one line lower than the normal format.
5. Lowest - prints the check two lines lower than the normal format.
Print for Selected Vendors (radio button)
If this option is selected. The following options will appear.

This option allows for a limited number of checks to be printed and/or handchecks to be posted. This is useful when it is necessary to print only one check or post one handcheck. See also User Selected Handchecks.
Hand Payments that Will Be Processed During Check Run (list box)
This is a list of all the Handwritten checks and Credit Card Payments that will be posted during this check run. This is for information only and cannot be changed from this screen.
Print Alignment Checks (button)
A dummy check may be printed to verify that the check forms are aligned properly in the printer before the invoice checks are printed. If a dummy check is desired, press this button. Several dummy checks may be printed by pressing this button. Sample Alignment Checks
Press the Preview button to generate the selected checks without performing the associated posting.
Print Checks (button) or Print Checks / Post Hand Payments (button)
see Printing Checks and / or Posting Hand Payments
Checks that can be Printed this Session
This is a list of all vendors with invoices currently selected for payment. This also includes handchecks to be posted. Use the arrow buttons to move vendors from this list to the User Selected Checks list.
This is a list of vendors to pay during this check run. This also includes handchecks to be posted. Use the arrow buttons to move vendors from this list back to the Checks that can be Printed this Session list.
This button selects the highlighted vendor from the Checks that can be Printed this Session category and places the vendor in the User Selected Checks category.
This button selects the highlighted vendor from the Checks that can be Printed this Session category and returns the vendor to the User Selected Checks category.
This button selects all the highlighted vendors from the Checks that can be Printed this Session category and places the vendor in the User Selected Checks category.
This button selects all the highlighted vendors from the Checks that can be Printed this Session category and returns the vendor to the User Selected Checks category.
Printing Checks and/or Posting Hand Payments
There are three possible options for the name of the Print button. It works the same no matter its name.
1. If only checks are selected, the button will be Print Checks.
2. The button will change to Print Checks / Post Hand Payments if both checks and hand payments are selected.
3. If only Hand Payments have been selected, the button will change to Post Hand Payments .
These three buttons work the same except if only Hand Payments are posted the following screen will be bypassed. Press the Print Checks button and the following screen comes into view.

Note: Checks are usually printed on the same printer as other reports; therefore, a change of forms is usually necessary at this point. If there is a separate printer that is always loaded with check stock, ignore this message. Press the Continue button and the checks will be printed. The following screen will then come into view.

If all the checks printed properly, select the Yes Button. The following screen will come into view.

Press the Continue button. Two Reports will be printed:
After all the Checks have been printed, the following screen will come into view. This option will print a report of lien waivers for all vendors who had checks printed and have the lien waiver box selected in Vendor Entry.

If the Yes button is pushed, the Lien Waivers will be printed. If the No button is selected, the program will return to the main screen.
If any of the checks did not printed properly, press the No button and the following screen will come into view.

There are two methods available for reprinting checks. Both are described below.
1. Range of Check Numbers (radio button)
This allows for reprinting a numeric range of checks. Enter the number of the last check that printed properly and the number of the next available blank check on the check form. Note: The system keeps track of the check form numbers it prints. If the next available blank check number is not entered correctly, then the cursor will return to this field and blink until the correct check number is entered.
2. Individual Checks (radio button)
This allows for reprinting of individual checks or selected groups of checks. The checks which have been printed are listed in the Checks Printed by System box. Use the arrow buttons to move the desired checks to the Reprint the Following Checks box.
Press the Continue button. When the checks have finished printing, the message "Did all the checks print properly?" will appear again. The Reprint Checks screen will keep appearing until Yes is answered to the question or the Cancel Check Run button is pressed.
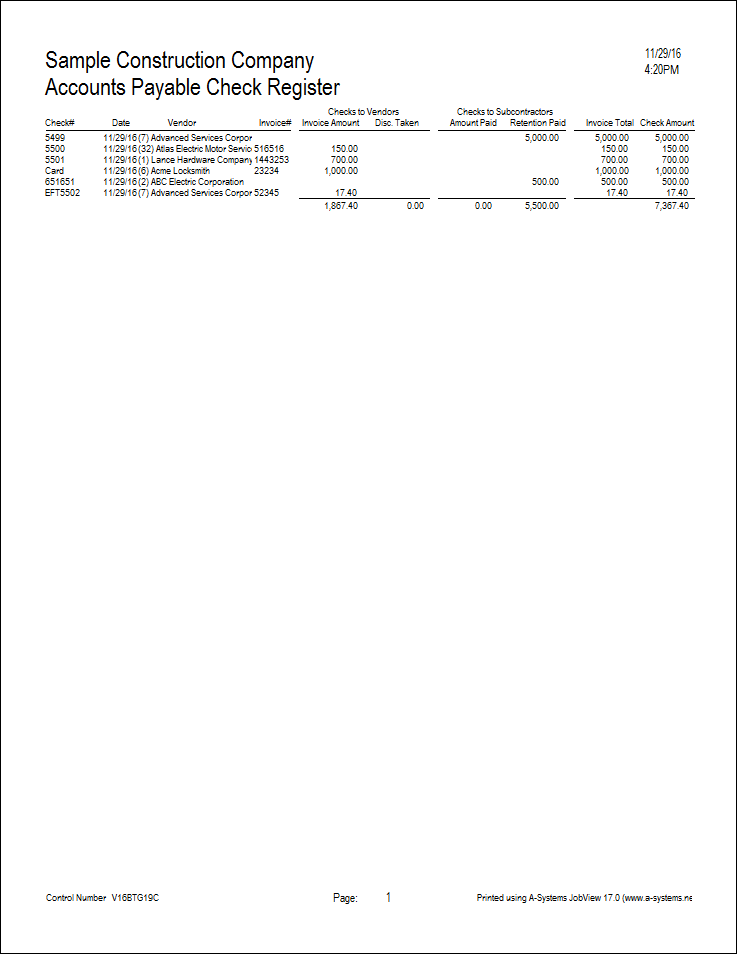
Report Description - Check Register
The Accounts Payable Check Register Report is a listing of the checks in the Accounts Payable Check Register File. The report heading includes the report title, date, company name and page number.
Check Number
This is the check number.
Description
This is the name and number of the vendor or subcontractor to whom the check was made payable.
Check Amount
This is the gross amount of the check to the vendor.
Invoice #
The Invoice number is listed.
Detail Amount
This is the individual items that comprise the check. For example: In the Check Register below Ace Iron Works has 5 Detail Amounts but only one Check amount. The Check amount is the sum of all the Detail Amounts.
Report Description: GL Summary of Payables Check Posting
The General Summary of Payables Check Posting Report is a listing of the checks in the Accounts Payable Check Register File. The report heading includes the report title, date, company name and page number.
Account #
This column show the account number of the transaction.
Period # / Date
This is the fiscal period and date of the transaction.
Journal ID / Number / Line
The identifying journal is printed first. The journal number is printed unless the transaction is a journal summary. The journal line number is also printed unless the transaction is a journal summary.
Description
This column show the description of the transaction. The name of the transaction will be listed. If this is a check transaction, the account and check number will be displayed. The name of the Subcontractor or Vendor will be listed if applicable.
Example
A. Invoice -> "A/R Posting: Invoice " or "A/P Posting: Invoice"
B. Check -> "Cash Account, Check # 12345"
C. Subcontractor or Vendor --> " James Stewart" or "Jones Paint and Gas"
Cost Disbursement
If the transaction is posted to a subsidiary account, a job cost code, or an equipment cost category, the identifying information is printed. For jobs, the job number, cost code group, and level are listed. For equipment, the equipment ID and cost category are listed. If a job number, cost code, Equipment ID or cost category is invalid, ‘CTRL' will be printed instead of an account number. If no assignment was made, "NONE" will be printed.
Hours
The hours applied to this check.
Amount
This is the gross amount of the check to the vendor.
Subtotal
Each transaction is added to the running balance as it is listed. The final transaction will make the Subtotal zero.
Record #
Record number is the general ledger transaction number. As transactions are posted, they are appended to the ‘General Ledger Master Transaction File’ and assigned the next record number. This number is used by the system to refer to this transaction.

Report Sample - Voucher (for EFT payments)

Report Sample - Check Register
Report Sample - GL Summary of Payables Check Posting
