![]() Accounts Payable: Vendors
Accounts Payable: Vendors
Vendors include any companies or individuals from whom goods or services are purchased. The Vendor program is used to enter, edit or delete vendor or subcontractor information.
There are three ways to access the Vendor Entry screen:
1. Select Vendors from the Accounts Payable Main Menu.
2. Press the lookup button by the Vendor # (or name) on the many Account Payable screens.
3. Select Vendors from the Lookup Table.
The following screen will come into view.
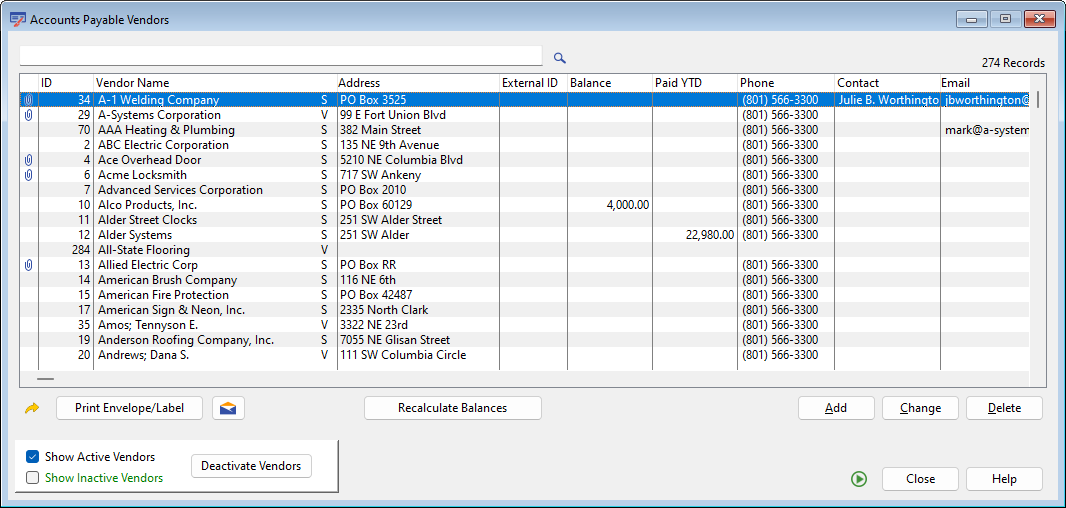
Click on any column header to sort the listed items. This will be useful when the list of vendors has grown. Some additional columns are listed off to the right. Use the thumb at the bottom of the list box to scroll to the right to see additional columns.
List of Vendors
Enter the desired Vendor number in this field and the system will automatically search for the matching record. Press the lookup button to search for specific keywords. The following screen will come into view when the lookup button is pressed.
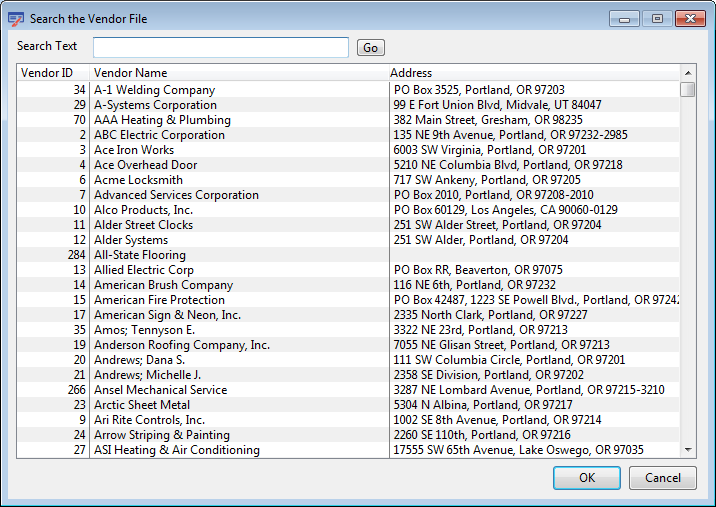
Enter one or more keywords in the blank field and press the Go button. The accounting system will return all vendors whose vendor name or address contains the entered keywords. Select the desired vendor and press the OK button.
Print Envelope/Label (button)
Click this button to immediately print an envelope or a mailing label for this address. See the Printing Envelopes and Labels help topic for more information.
Send an Email Message (button) ![]()
If an Email address has been entered for the highlighted vendor, clicking this button will allow the user to immediately send an email.
Recalculate Balances (button)
Click this button to recalculate the figure in the Balance column of the list box for all vendors. This will be the additive total of the remaining balance of all unpaid invoices.
Add or Change (button)
Press the Add button and or highlight the vendor whose record is to be accessed and press the Change button. For more information, see Add or Change a Vendor Entry.
Highlight the desired record and press the Delete button. The following screen will come into view.

Press the Yes button and the record will be deleted. Warning: Once a vendor is deleted, the information cannot be recovered. If the No button is pressed, the menu will be displayed without changing or deleting the record.
This button closes the program and returns to the main screen.
Help (button)
see How to use help
Vendor information is categorized into seven tabs with each tab having its own screen. The tabs may be selected in any order, the only limitation being that vendors may only be added or deleted through the main Vendor Entry screen. Each tab is accessed by clicking on it with the mouse or by pressing the <Alt> key plus the underlined letter.
To add a vendor, press the Add button and the system will automatically assign the next available vendor number. If the number of a deleted vendor is entered, the program will insert the new vendor in the deleted vendor’s space. The following screen will come into view.
To edit an existing vendor, Highlight the desired record and either press the enter key or press the Change button. The following screen will come into view.
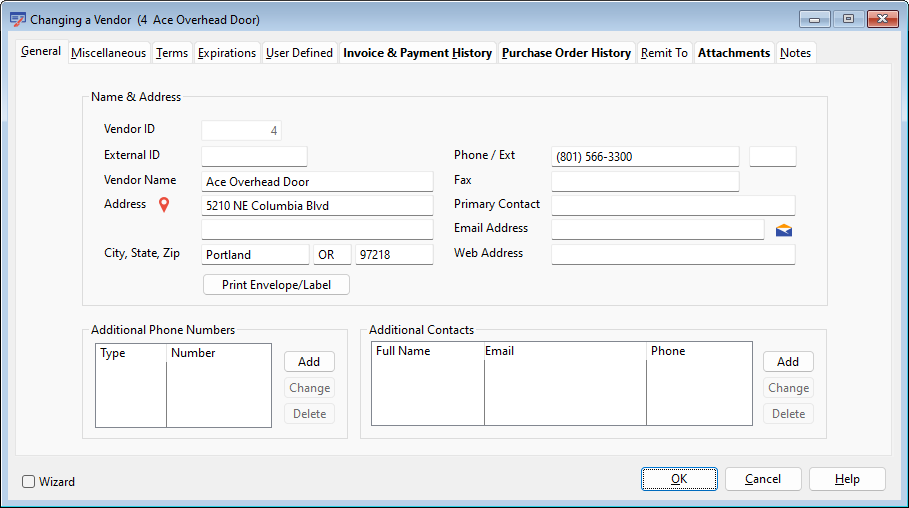
The General tab contains important vendor information including the vendor number, name and address. This screen also contains the phone number(s), email address of the vendor and additional contact information. For more information, see the General Tab. To access this tab, click on it with the mouse or press <Alt> + 'G'
Additional information for this vendor is added through this screen. This information includes, Tax information, Amounts Paid, credit holds, lien wavers and Customer account information. If this vendor should have a 1099 printed, this is also specified on this screen and the 1099 may be previewed. For more information, see the Miscellaneous Tab. To access this tab, click on it with the mouse or press <Alt>+ 'M'
From this tab, discount and due terms for the vendor may be entered. For more information, see the Terms Tab. To access this tab, click on it with the mouse or press <Alt>+ 'T'
This tab is used to enter and edit information for Worker’s Compensation and Liability insurance. Any additional expirations may be entered in this screen. For more information, see the Expirations Tab. To access this tab, click on it with the mouse or press <Alt>+ 'E'
User defined information is entered through this screen. For more information, see the User Defined Tab. To access this tab, click on it with the mouse or press <Alt>+ 'U'
This screen lists all the Invoices of this Vendor for the Fiscal Year. This is for information only. For more information, see the Invoice History Tab. To access this tab, click on it with the mouse or press <Alt>+ 'H'
This screen list all addresses to which payments may be remitted for this Vendor. For more information, see the Remit To Tab. To access this tab, click on it with the mouse or press <Alt>+ 'R'
This tab allows the user to attach outside files to the vendor record. For more information, see the Attachments Tab. To access this tab, click on it with the mouse or press <Alt>+ 'A'
This screen lists all the notes for the vendor. For more information, see the Notes Tab. To access this tab, click on it with the mouse or press <Alt>+ 'N'
The General tab will come into view by default when the Add or Change button is pressed. From this tab, the vendor number, name and address may be entered or changed. This screen also contains the phone number(s), email address of the vendor and additional contact information.
View Map of Address (button) ![]()
Clicking this button will allow the user to display a map of the address or driving directions from the company address to this address.
Vendor ID (drop-down list)
The Vendor ID is the number used throughout the Accounts Payable system to identify a vendor. Vendor numbers are assigned consecutively starting with 1. This field will only be available if this is a new vendor. The next available number will be automatically assigned by the system and will be presented in a drop-down list box. The list of available Vendor ID numbers will also include any numbers that have been skipped in the past.
External ID
If invoices are being imported from an external source, that external source may have a different numbering system for the vendors. If this is the case, enter this vendor's external identification number in this field. When importing invoices from the external source, the External ID will be used to link the imported invoice with the correct vendor.
Name
This may be a company name or an individual's name. This is the name as it is to appear on checks, reports, etc.
There are three choices for name entry:
1. Company Name
Enter the name of the company as it is to appear on checks,reports,etc.
Example:![]()
2. Individual's name (sorted by last name in vendor file)
The sort order for this individual will be by the last name in the vendor file. However, the name will be printed in the following order: first name, middle initial, last name on checks, reports, etc. Enter the vendor's name in the following format: Last Name;First Name Middle Initial
Example:![]()
3. Individual's name (sorted by first name in the vendor file)
The sort order for this individual will be by the first name in the vendor file. However, the name will be printed in the following order: first name, middle initial, last name on checks, reports, etc. Enter the vendor's name in the following format: First Name Middle Initial Last Name.
Example :![]()
Address line 1
Two lines are allowed for the address. Each line will allow up to 22 characters. Two lines may come in handy if:
1) The street address is especially long.
2) A street address and a P.O. Box are desired.
3) An individual within the company is specified.
4) A particular department within the company is specified.
Address line 2
This is the second of the two address lines mentioned above. See description for Address line 1.
City, State, Zip
Enter the city, state and zip code.
Print Envelope/Label (button)
Click this button to immediately print an envelope or a mailing label for this address. See the Printing Envelopes and Labels help topic for more information.
Phone / Ext
This is the telephone number of the vendor. The accounting system will automatically insert the formatting characters. The second field is for any required extensions. Enter up to five characters.
Fax
This is the fax number of the vendor. The program will automatically insert the formatting characters.
This is the Email address of the customer.
Send an Email Message (button) ![]()
If an Email address has been entered, clicking this button will allow the user to immediately send an email.
Web Address
This is the Web Address of the customer.
Primary Contact
This is the name of the contact person.
This table lists the additional telephone numbers and types.
Type
This is the type of number, i.e. phone, fax, modem,etc.
Number and Extension
These are additional telephone numbers and extensions of the vendor. The program will automatically insert the formatting characters.
Press the Add or Change button and the following screens comes into view. Enter the appropriate information and press the OK button.

The table lists the additional contact person(s), telephone number and email.
Full Name and Phone number
The full name and phone number of additional contacts are listed here.
Add or Change (button)
see Adding or Changing a Contact
Press the Miscellaneous tab and the following screen comes into view. From this tab, the vendor number, name and address may be entered or changed. This screen also contains the phone number(s), email address of the vendor and additional contact information.

Classification
This is the Vendor Classification. This optional field may be used to filter or sort DataView vendor listings.
Federal ID Number
This number is used by the 1099 PRINTING program as the identification number of the vendor to the IRS.
Credit Limit
Enter the Credit Limit allowed by this Vendor.
Default Credit Card
Enter the Account number to be used as the Default Credit Card Account.
Default Retention Rate
This is the default retention rate for this vendor that will be used during invoice entry.
Current Balance
This is the additive total of the remaining balance of all unpaid invoices. The figure is automatically updated each time invoices or payments are posted.
Recalculate Balance (button) ![]()
Click this button to recalculate the Current Balance figure for this vendor.
Vendor (radio button)
The radio button being checked signifies a standard vendor. This field is mainly informative. A subcontractor may have vendor invoices assigned and a vendor may have vouchers entered.
Subcontractor (radio button)
If the subcontractor radio button is checked, the vendor is a subcontractor. This field is mainly informative. A subcontractor may have vendor invoices assigned and a vendor may have vouchers entered.
Setup Electronic Funds Transfer (button)
Vendors can be paid by the system either by printed check or by electronic funds transfer (EFT). Click this button to modify the EFT settings for this vendor.

Bank Name
Enter the name of the vendor’s bank.
ABA Routing
Enter the ABA Routing Number for the bank.
Account Number
Enter the account number of the account to which funds should be transferred to pay for Accounts Payable Invoices from this vendor.
Checking / Savings (radio buttons)
Indicate whether electronic payments to this vendor bank account will be deposited in checking or savings.
Generate Pre-notification ACH File (check box)
Check this box if the first attempt to create an ACH file for this vendor should be marked as a Pre-Notification transaction. This means the money will not actually be transferred, but the bank will be able to determine whether the Routing Number and Account Number settings are accurate.
Vendor is Active (check box)
If the Vendor is currently active, check this box.
Copayee Required (check box)
Some subcontractors require that a check be made out to their supplier as well as their own company. Checks sent to such subcontractors might therefore need a co-payee. If this subcontractor requires such a co-payee, check this box. During payment selection, if desired, specify a co-payee for specific checks for this vendor. A default co-payee for this vendor may be supplied in the field to the right.
Hold all Invoice Payments (check box)
Through this check box a hold may be placed on all invoice payments or the hold may be removed.
1. To place a hold on all invoice payments for this vendor.
If this box is checked, a hold is placed on all invoice payments for this vendor. If an invoice is posted while this box is checked, that invoice has a hold placed on it in Payment Selection. All invoices in Payment Selection for this vendor will not be paid until this box is unchecked or the Hold payment check box in Partial Payment / Other Pay in Payment Selection is unchecked. Any unpaid invoices for this vendor will be placed on hold also. Through this screen it is not possible to select only one invoice to be placed on hold. This is possible in Payment Selection. See Hold Payment for more information. Note: Checking this box does not affect any checks for this vendor in Print Checks/Post Handcheck.
2. To remove a hold on all invoice payments for this vendor.
If this box is unchecked, all holds placed on all invoice payments for this vendor are removed. If an invoice is posted while this box is unchecked, no hold is placed on it in Payment Selection. All invoices in Payment Selection for this vendor will be released from any previous hold that was placed.
Mailing List (check box)
Check this box to include the Vendor on the Vendor Mailing List. This list can then be used to limit the number of Vendors in the Vendor Listing Report.
Print Separate Check for Each Invoice (check box)
Check this box to print a separate check for each invoice to which payment is made.
Print Trade Invoice Detail on Check Stub (check box)
Check this box to include the Vendor's Invoice Details on printed Check Stubs.
Print Lien Waivers (check box)
If this box is checked, it enables the option that allows a Lien Waiver, or a "Lien Release Form", to be printed when a check is generated for this vendor.
Default Sales Tax Rate
Entering a rate here will allow sales tax to be calculated on individual invoices. Usually, an invoice from a vendor will contain a sales tax amount. That amount can be entered into the invoice entry window by the operator. In some cases, however, the sales tax is not included on the printed invoice. If this is the case, it can be useful to know the rate at which to calculate the sales tax.
Preferred Invoice Type (pull-down list)
When invoices are entered for this vendor, the user may have a preference as to which type of invoice should be entered. Select from Trade Invoice, Subcontract Invoice or No Preference
Default Invoice Pay Type (pull-down list)
When invoices are entered for this vendor, the user may prefer that the invoices are entered as Pre-Paid by handwritten check or by credit card. Select from Open, Paid by Handwritten Check, Paid by Credit Card or Open. If a preference is selected, all new invoices inserted for this vendor will default to the selected pay type.
Account number
Enter the user's customer account number. Example: the account number with the utility company.
Print Account Number on Check Face (check box)
Check this box and the number stored in the Account Number field will always be printed on checks to this vendor. The account number will be printed below the Vendor Address block.
Default G/L account
If all or most invoices from this vendor will be charged to a specific G/L account, enter that account number here. For example: if the vendor is the phone company enter the Telephone G/L account. Enter the account number or press the lookup button and the General Ledger Account screen will come into view.
DBA vendor (check box)
If the first address line contains the individual’s name for 1099 printing purposes, check this box. otherwise,leave the box unchecked.
Name
Enter the name of the individual who is doing business under a company name rather than his own name.
The software will track the amount paid to this vendor every year. A 1099 form can be printed at year end to be sent to the vendor and to the federal government.
1099 Type Selector (radio buttons)
Select the type of 1099 form to be printed for this vendor. The options available are No 1099, Print 1099-NEC (Non Employee Compensation), Print 1099-MISC (Miscellaneous), or Print 1099-INT (Interest). See Print 1099
Amount Paid by Year
This list box shows the amounts paid to this vendor for each of the year the company has done business with the vendor. This amount can be changed manually by highlighting the desired year and clicking the Preview 1099 button.
Recalculate Amount Paid (button)
Click this button and the system will recalculate the amounts paid to the vendor for each year and display the results in the list box.
Press the Preview 1099 button and the following screen comes into view.

The 1099 for this vendor will be printed as it is displayed on this window. To make changes to the appearance of the 1099, follow the instructions below.
Nonemployee compensation
This field will display the amount the vendor has been paid during the selected year. This amount is updated each time a payment is made to the vendor. If the number is changed manually in this field, additional payments will be added to the amount specified.
Federal income tax withheld
Enter the amount of federal income tax that was withheld when making payments to this vendor.
From this tab, discount and due terms for the vendor may be entered.

Term Description
This is the description of the vendor’s due terms. It may be up to 12 characters long. For example: net 30 days.
Choose either the Day of Month or the Number of Days from Invoice Date radio buttons.
Day of Month (radio button)
This field signifies that the invoice is due on a certain day of the following month.
![]()
This field signifies the day of the month on which the invoice will fall due.
Number of Days from Invoice Date (radio button)
This field signifies that the invoice is due a certain number of days from the invoice date.
![]()
This field signifies the number of days after the due date until the invoice will fall due.
Float Days
This is the number of days before the payment is late after the terms. For example: the payment is due on the 15th, however, a late fee accrues after the 25th. In this case, enter 10 float days.
Cutoff Date
If the Due Type is set to "Day of Month", this field will become available This is the day of the month after which the due date for the invoice will be set to the next month. For example: Invoices are due on the 20th of the month in which they were issued. If the invoice was issued on or after the 10th of the month (the cutoff date), they are due on the 20th of the following month.
Choose either the Day of Month or the Number of Days from Invoice Date radio button.
Term Description
This is the description of the discount terms.
Day of month (radio button)
This field signifies that the discount expires on a certain day of the following month.
![]()
This field signifies the day of the month on which the discount expires.
Number of Days from Invoice Date (radio button)
This field signifies that the discount expires a certain number of days from the invoice date.
![]()
This field signifies the number of days in which the discount expires.
Default Discount Rate
This is the percentage discount available from this vendor. Enter the percentage rate at which the discount is to be calculated.
Cutoff Date
If the Discount Type is set to "Day of Month", this field will become available This is the day of the month after which the discount expiration date for the invoice will be set to the next month. For example: If an invoice from this vendor is paid on or before the 5th of the month, the discount may be taken. If the invoice date is on or after the 3rd of the month, (the cutoff date), the discount expires on the 5th of the following month.
This tab is used to enter and edit information for insurance carried by the vendor. Any additional expirations may be entered in this screen. Press the Expirations tab and the following screen comes into view.

The accounting system stores the vendor's insurance status for Worker's Comp, General Liability, Excess Liability, Auto, and any other user defined insurance categories.
Make the appropriate entries for the four different insurance types.
Insurance Certificate on File (check box)
Check this box if the company has a copy of the vendor's Insurance Certificate. If there is no certificate on file, the general contractor may be required to pay the insurance at the subcontractor’s rate. The general contractor may then elect to backcharge the paid amount to the subcontractor when the subcontractor invoices the general contractor for work done.
Additional Insured Endorsement (check box)
Check this box if the insurance policy includes an “Additional Insured Endorsement.”
Waiver of Subrogation Endorsement (check box)
Check this box if the insurance policy includes a “Waiver of Subrogation Endorsement.”.
Insurance Carrier
Enter the name of the Insurance carrier.
Policy Number
Enter the policy number of the insurance.
Expiration
The expiration date is important because after the certificate expires, the general contractor may be required to pay the premium. Enter the date the subcontractor’s insurance certificate expires or press the lookup button and a Calendar will come into view. Choose the correct date and click the OK button.
Coverage Amount
Enter the amount of coverage this insurance policy provides.
Surcharge %
If the subcontractor’s certificate has expired, this percentage will be used to calculate the amount to be backcharged to the subcontractor.
Compliance (dropdown list box)
The system has two different methods for determining whether the user will be warned about this vendor insurance setting. First, if the "Certificate on File" box is checked and the "Expiration Date" has passed. When this is the case, the user will be warned based on the "Expiration Warning" check boxes at the bottom of this window. Since this method will not rely on a setting in this field, select "Not Used" here.
The second method is the use of this "Compliance" setting. Even if the vendor has a certificate on file and it has not yet expired, other factors may indicate that the vendor is not in compliance with the terms of the policy. If this is the case, use this dropdown to select the proper setting.
Any additional insurance policy information is listed in these columns.
Document
The type of document is displayed. For example: Auto Insurance.
Effective Date
The date the subcontractor’s insurance certificate became effective is displayed.
Expiration Date
The expiration date of the policy is displayed.
Coverage Amount
This is the amount of coverage this insurance policy provides.
Surcharge
The amount to be backcharged if the subcontractor’s certificate has expired is displayed.
Add or Change (button)
See Add or Change an Expiration Record
Delete (button)
see Delete a Record
It is possible to choose both of the following fields. The fields are used to remind the operator of the expiration of insurance during invoice entry and payment selection. If neither of the fields are chosen, there will be no warning.
Warn when Invoice Date exceeds Expiration Date (check box)
This field will flash a warning during invoice entry if the invoice date exceeds the Expiration date of the insurance certificates.
Warn 30 days in Advance of Expiration (check box)
This field will flash a warning thirty days before the Expiration date of the insurance certificates.
Expirations on Printed Check Stubs
These settings allow the user to control whether insurance expiration messages will be printed on check stubs.
Print Expirations on Standard Check Stub (check box)
If this box is checked, insurance expiration messages will be printed on standard checks paid to this vendor.
Print Expirations on Stub with Subcontract Summary (check box)
If this box is checked, insurance expiration messages will be printed on subcontract checks paid to this vendor.
Add or Change an Expiration Record
Press the Add or Change button and the following screen comes into view.

Document Type
Enter the Type of Document. For example: Auto Insurance.
Effective Date
Enter the date the subcontractor’s insurance certificate became effective or press the lookup button and a Calendar will come into view. Choose the correct date and click the OK button.
Expiration Date
Enter the expiration date of the policy or press the lookup button and a Calendar will come into view Choose the correct date and click the OK button.
Carrier
Enter the name of the Insurance carrier.
Policy Number
Enter the policy number of the insurance.
Certificate on File (check box)
Check this box if the subcontractor has a Certificate on File. If there is no certificate, the general contractor may be required to pay the insurance at the subcontractor’s rate and backcharge the paid amount to the subcontractor.
Additional Insured Endorsement (check box)
Check this box if the insurance policy includes an “Additional Insured Endorsement.”
Waiver of Subrogation Endorsement (check box)
Check this box if the insurance policy includes a “Waiver of Subrogation Endorsement.”
Coverage Amount
Enter the amount of coverage this insurance policy provides.
Surcharge if Expired
If the subcontractor’s certificate has expired, this percentage will be used to calculate the amount to be backcharged to the subcontractor.
Compliance Status
The system has two different methods for determining whether the user will be warned about this vendor expiration setting. First, if the "Certificate on File" box is checked and the "Expiration Date" has passed. When this is the case, the user will be warned based on the "Expiration Warning" check boxes at the bottom of this window.
The second method is the use of this "Compliance" setting. Even if the vendor has a certificate on file and it has not yet expired, other factors may indicate that the vendor is not in compliance with the terms of the policy. If this is the case, use this dropdown to select the proper setting.
Press the User Defined tab and the following screen comes into view. The User Defined prompts are universal and are only able to be edited if the Edit Prompt box is checked.

The fields to the right of each Prompt are to save whatever information is to be recorded for this vendor.
Check the Edit Prompts box and the Prompt column is changed to allow Prompts to be added or edited. Uncheck the Edit Prompts box and the Prompts are saved. Note: The Prompts are not unique to each vendor. They are the same for all vendors. The data entered in the right hand column is unique to each vendor. This can be any information. For example: The Prompt could be shirt size and the value in the dropdown list box could be size 17 x 35.
![]()
Press the Invoice History tab and the following screen comes into view. This screen is for information purposes only. It lists all the Invoices for the Fiscal Year for this Vendor. The tabs are for Sorting between All Invoices, Open and Ready Only, or Paid Only Invoices.

Search For
To use the Search capability, first select what kind of search is to be made from the pull-down list. Next supply a value to search for in the entry box. Click the Search button and the next invoice matching the search criteria will be highlighted. To search for the next matching invoice, press the F3 key on the keyboard. If another invoice is found that matches the criteria, it will be highlighted.
Invoice #
This column contains the invoice number.
Description
This is the description entered by the user on the invoice header.
Invoice Date
This is the date of the invoice.
Invoice Amount
This column shows the total invoice amount. The total for all invoices will be displayed at the bottom of this column.
Flags
This column includes two alphabetic codes, the first letter represents the Invoice Type and the second letter represents the Pay Status.
Invoice Types
‘T’= Trade invoices, ‘S'=Subcontract invoices, and ‘R'=Retention payment invoices.
Pay Status
‘O'=Open, ‘R'=Ready to pay, and ‘P' =Paid.
For example: a Trade Invoice which has not yet been paid or selected for payment would display as ‘T O'.
Paid Date
This is the date of the most recent payment made against this invoice. If more than one payment has been made against this invoice, the date will be replaced with the word, "Multiple." In order to see the details for each payment, click the View Highlighted Invoice button.
Check #
This is the number of the check or means of payment of the most recent payment made against this invoice. If more than one payment has been made against this invoice, this will indicate the number of payments made.
Amount Paid
This is the total of all payments made against this invoice.
Hide Voids (check box)
If this box is checked, the listed invoices will exclude invoices that have been voided.
Totals (check box)
If this box is checked, totals will be displayed at the bottom of the amount columns in the list box.
Job Limit
The Job Limit field allows the user to limit the number of Invoices displayed to those Invoices attached to a specific Job. Enter the Job Number in this field or press the lookup button and select the Job from the Job Setup screen.
Select for Payment (button)
Click this button and the Select Invoices for Payment window will open with this invoice highlighted and selected for payment.
Print Lien Waiver (button)
Clicking this button will test to see if a Lien Waiver has been created for the highlighted invoice. If one is not present, the system will create one. The program will then allow the user to print the lien waiver using the Lien Waiver Printing procedure.
Void Invoice (button)
Clicking this button will void the highlighted invoice using the established Auto Invoice Void procedure.
Void Check (button)
Clicking this button will void the check associated with the highlighted invoices using the established Auto Check Void procedure.
View Highlighted Invoice (button)
Press the View Highlighted Invoice button to open the Invoice Overview Screen.
Red Light (button)
Press the Red Light button to place a hold on the payment of the highlighted invoice.
Green Light (button)
Press the Green Light button to release the hold placed on the highlighted invoice.
Press the Payments tab and the following screen will come into view.
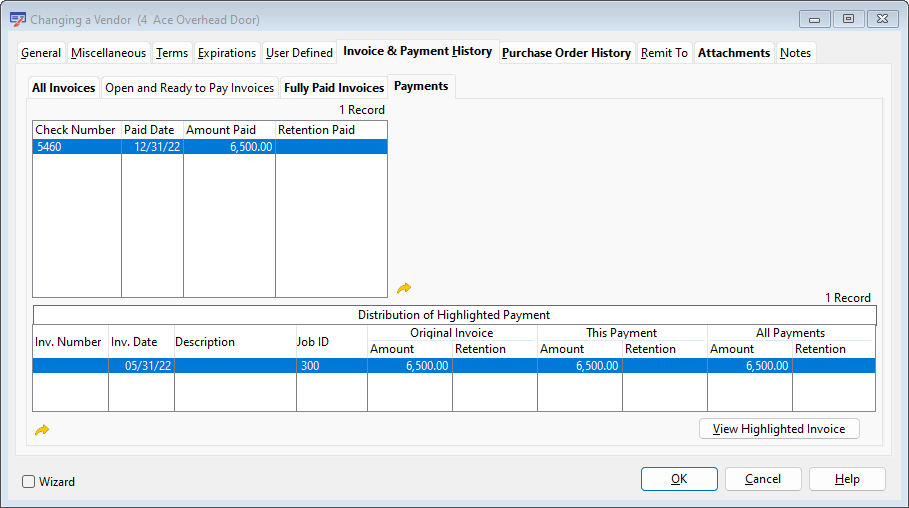
This screen list all payments made to this vendor. As a payment is highlighted, the system will display the distribution of the highlighted payment in the bottom list box.
Press the Purchase Order History tab and the following screen will come into view. This screen list all Purchase Orders issued to this vendor.
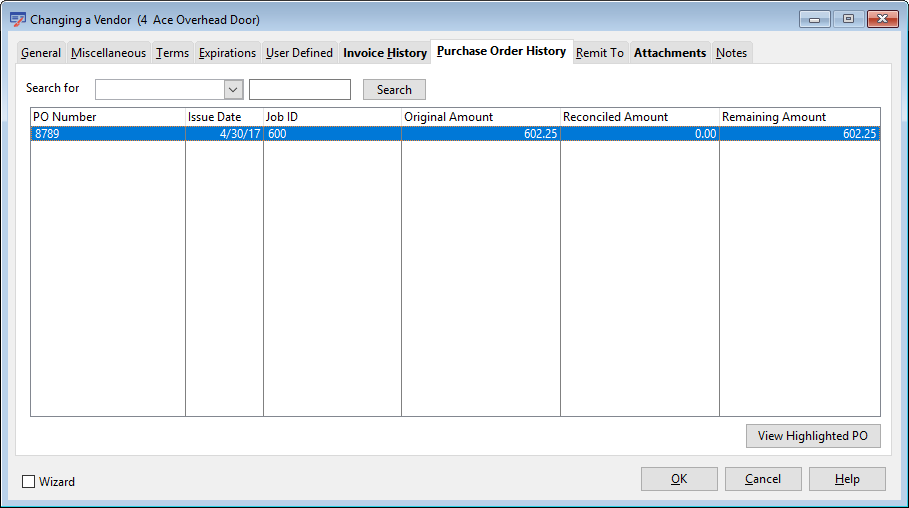
View Highlighted PO (button)
Press this button to see an overview window with all the details of the highlighted Purchase Order.
Press the Remit To tab and the following screen will come into view. This screen list all addresses to which payments may be remitted for this Vendor. The address entered here will be used by the Accounts Payable Select Invoices For Payment and Accounts Payable Check Printing programs.

Adding a Remit To Address
To Add a new Remit To address, click the Add button. The following window will appear:

Once one or more Remit To addresses have been entered, the user may indicate which is the default Remit To address for payments to this vendor by selecting Default to Main Vendor Address or by highlighting the preferred address and selecting Default To One of the Addresses Below.
View Map of Address (button) ![]()
Clicking this button will allow the user to display a map of the address or driving directions from the company address to this address.
Press the Attachments tabs and the following screen comes into view. This tab allows the user to attach outside files to the vendor record. For example: a scanned copy of an insurance certificate from this vendor can be attached.

See the Attachments topic for a full description of how attachments work.
Press the Notes tab and the following screen comes into view. This screen lists all the notes for the vendor. There is no limit on the number of notes for the vendor.

These fields are for information only. It may be used for any additional vendor information. There is no limit to the number of entries.
Reminder Icon
If this note has been flagged as a reminder note, the reminder icon will be displayed in the first column.
Date
The date the note was entered.
Subject
The subject of the note is displayed. This is user defined. For example: Adding Notes
Add or Change (button)
See Adding or Changing a Note.
Print (button)
See Printing Notes.
Vendors displayed in the list box on the main Vendor Browse window can be filtered by the vendor Active flag. There may be a time when the operator desires to mark multiple vendors as Inactive based on the date of the last business transacted with the vendor. Click this button and the following window will appear:

Enter the desired cutoff date in the date field. The list will be filtered to include only vendors who have had no activity (no invoices or payments) posted since the cutoff date. Those vendors can now be tagged or untagged. When the Deactivate Tagged Vendors button is pressed. The Active flag on all the tagged vendors will be set to "Inactive."