![]() Bank Statement Reconciliation
Bank Statement Reconciliation
When a statement is received from the bank, outstanding checks and deposits are reconciled using the Bank Statement Reconciliation option in the General Ledger Main Menu. The following screen will come into view. The Cash and Credit Card Accounts will be listed.

Reconcile Highlighted Account (button)
see Bank Statement Reconciliation
This button closes the program and returns to the main screen.
Reconcile Accounts
Bank statement reconciliation is performed by selecting the desired General Ledger Account and optionally setting a cutoff date. Printouts can be made of outstanding transactions and check registers. When transactions are marked using this program, the Marked status is only temporary until the final reconciliation analysis is in balance and the analysis report has been printed.
In the Reconciliation process there are seven screens.
1. Date Range
2. Automatic Reconciliation with Electronic Bank Statement
3. Transaction Marking
4. Bank Statement Information
5. Marked Transaction Analysis
6. Outstanding Transactions
7. Outstanding Transactions Analysis
Press the Reconcile Highlighted Account button and the following window comes into view. The first screen to be displayed is Date Range .
Show Bank Account screen Show Credit Card Screen


Enter a Cutoff Date-All transaction after this date will be ignored...
Enter the desired date, press the arrows to select the date, or press the lookup button. If the lookup button is pressed, a Calendar will come into view. Highlight the date and press the OK button.
Enter a Cutoff Fiscal Period - All transactions after this fiscal period will be ignored...
Enter the desired fiscal period, press the arrows to select the period, or press the lookup button. If the lookup button is pressed, a Fiscal Period Maintenance window will come into view. Highlight the date and press the OK button.
Automatically Reconcile with Electronic Bank Statement (check box)
The accounting system is capable of reading a data file downloaded from the bank which includes records of all transactions that have cleared the bank. To learn how to download a file of this type, contact your bank. When downloading the file, make certain you follow these two important instructions. 1) The format for the file should be either the Microsoft Money format or the Quicken format. 2) The date range must include the current date.
For example: if today is the 14th of April and you wish to reconcile the bank account for March transactions, retrieve all transactions from March 1st to April 14th (today). If you attempt to retrieve transactions only from March 1st to March 31st, the accounting system will reject the file and ask you to retrieve a new one.
Print a Check Register or Print Transaction Register
If this button is pressed, the Check Register Listing screen will come into view.
Advances to the next screen.
Returns to the previous screen.
Automatic Reconciliation with Electronic Bank Statement
From the Account Selection screen press the Next>> button and the following screen comes into view. This screen only appears if the Automatically Reconcile with Electronic Bank Statement box was checked on the previous screen. The file downloaded from the bank can be accessed and read using this screen.

Statement File Name
Enter the path and filename of the file downloaded from the bank, or use the lookup button to look for the file. Once the filename has been entered, the system will retrieve the information from the file and display it in the list box.
Statement Period From and To
Once the information has been brought into the list box, use these date fields to limit the displayed transactions to a desired date range.
When the desired range of bank statement transactions is displayed, click the Next>> button to move to the next step where accounting system transactions can be marked.
From the Account Selection or Automatic Reconciliation with Bank Statement screen press the Next>> button and the following screen comes into view. Use this screen to specify which transactions have cleared the bank and appear on the bank statement as being reconciled. Transactions appearing on this screen are limited to Outstanding transactions whose transaction dates fall before the Cutoff Date set in the previous screen. Check transactions are listed in check number order. Deposits and other transactions appear at the bottom of the listing. Mark any transactions which have cleared the bank. The marked transactions will have a check in the box.
There are four ways to mark a highlighted item:
1. Click on the Mark / Unmark button
2. Press the space bar.
3. Double Click on the Check box at the left of the item.
4. To mark a specific range of transactions, click to highlight the first transaction then Shift-Click on the last desired transaction. All the transactions in between will be marked.

Search for Transaction (pull-down list box and entry field)
The operator can search for transactions using any of the search criteria found in the pull-down list. First, select the desired criterion from the list then type the desired value in the search box. When Enter or Tab is pressed, the program will search for the next instance of the desried value. If a transaction matching the criteria is found, the program jumps to the place in the list where the transaction is located and the transaction is highlighted.
F3 Key for Repeated Searching
Press the F3 key on the keyboard to repeat the search. The next transaction matching the search criteria will be highlighted.
If the no matching transactions are found, the following screen comes into view. Press the OK button.

Press this button to Jump to the First Check in the list.
Jump to First Deposit (button)
Press this button to Jump to the First Deposit in the list.
Pressing this button will display drill-down information about the highlighted transaction. For example, if a check is highlighted and the button is pressed, the following screen will appear:

Click this button to view the transaction in context, showing all the transactions in its posting journal. See G/L Summary.
Highlight the desired transaction and press this button. It will mark or unmark the transaction depending on the original state. If it was originally marked, it will unmark it . If it was unmarked, it will mark it.
This button, when pressed, marks all transactions in the list.
This button, when pressed, unmarks all transactions in the list.
Click this button to mark an entire range of check numbers as having cleared. The following window will appear:

Indicate a beginning and ending check number for the range to be cleared. When OK is pressed, all checks within this range will be marked.
Marked Checks
The total amount of Cleared Checks.
Marked Deposit/Others
The total amount of Marked Deposits/Others.
During the marking phase, it may become apparent that some transactions that are shown on the bank statement have not yet been entered into the accounting system. Use this feature to jump to the proper program for adding those transactions. Click this button and the following prompt will appear:

Click the button that corresponds with the entry program desired. After entries are created and posted in the selected program, the reconciliation will be updated to include the new transactions.
The Bank Statement Information screen allows entry of information from the bank statement. From the Transaction Marking screen, press the Next>> button and the following screen comes into view.

Statement Ending Date
Enter the statement ending date. This may or may not be the same date entered as the Cutoff Date for this reconciliation process.
Beginning Balance
Enter the Beginning Balance reflected on the bank statement.
Ending Balance
Enter the Ending Balance reflected on the bank statement.
Total Checks
Enter the total amount of checks from the bank statement.
Total deposits
Enter the total amount of deposits from the bank statement.
Service Charges
Enter the amount of the Service Charges from the bank statement.
After all entries have been made to this screen, push the Next>> button. The system will calculate the difference between the beginning and ending balance and compare it with the total of the Checks/Deposits/Service Charges. If the statement figures are out of balance, the following screen will come into view. If the statement figures are not out of balance or the Yes button is pressed, the Marked Transaction Analysis screen comes into view. If the No button is pressed, the program returns to the Bank Statement Information screen

From the Bank Statement Information screen press the Next>> button and the following screen comes into view. This screen is for information only. To change the information, push the <<Back button and the previous screen will come into view.

Computer
The system will calculate the Ending Balance by taking the Current Balance and subtracting all outstanding (unmarked) transactions. The beginning balance is calculated by further subtracting all marked transactions.
Statement
The statement information will be listed in this column.
Difference
This column must balance before proceeding with the reconciliation process. In order for this screen to balance, the Difference column should show 0.00 in the Beginning Balance row and 0.00 in the Ending Balance row. The two remaining columns should also be 0.00; however, they may be non-zero as long as they are equal to each other.
Beginning Balance
This is the Beginning balance at the start of this statement.
Cleared Checks
This is the total amount of all cleared checks.
Cleared Deposits/ Other
This is the total amount of all Cleared Deposits/Other.
Ending Balance
This is the Ending Balance of this statement.
From the Marked Transaction Analysis screen press the Next>> button and the following screen comes into view. Select outstanding transactions to print as desired. Press the Print Listing button and all the selected Outstanding Transactions will be printed.

Outstanding Transactions Analysis
From the Outstanding Transactions screen press the Next>> button and the following screen comes into view.
At this point, push the Finish button and the Reconciliation will be finished. All checking account transactions that have been Marked will be change to Cleared. To print a summary of the entire reconciliation process, press the Print Reconciliation Analysis button.
If the figures do not match, a warning screen will be displayed titled "Figures Do Not Match!" At this point, a further attempt to complete the reconciliation process successfully by marking more transactions, adding deposits or service charges through the General Ledger Batch Transaction Entry system, or adjusting the Computer Cash Account balance should be made.
This button will show information for reconciliations that have been completed on the highlighted account. Click the button and the following window will come into view.
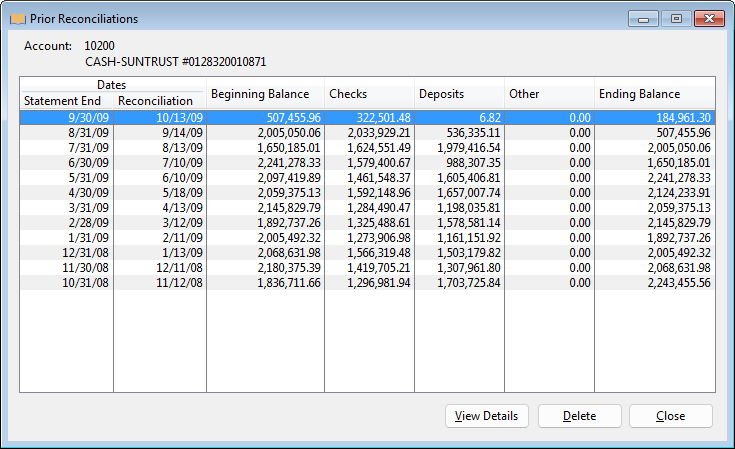
This widow shows a list of all previously completed reconciliations for this account.
Delete (button)
Click this button to delete the highlighted reconciliation. When a reconciliation is deleted, all transactions that were Cleared during the reconciliation process will be reset to Unreconciled. Only the most recent prior reconciliation can be deleted. This means that if a reconciliation that happened 3 months ago needs to be deleted, the reconciliations for the intervening two months will have to be deleted first.
View Details (button)
Click this button and the following window will be displayed.

The tabs on this window correspond with the reconciliation screens described above.